본 내용은 자바의 정석 3rd Edition을 참고하여 작성되었습니다. 개인적으로 학습한 내용을 복습하기 목적이기 때문에 내용상 오류가 있을 수 있습니다.
1. 인터페이스(interface)
인터페이스는 일종의 추상클래스 로서 추상클래스처럼 추상메서드를 갖지만 추상클래스보다 추상화 정도가 높아서 추상클래스와 달리 일반메서드, 멤버변수를 구성원으로 가질 수 없다.
- 추상클래스 : 부분적으로 완성된 “미완성 설계도”
- 인터페이스 : 구현된 것이 하나도 없이 밑그림만 그려진 “기본 설계도”
2. 인터페이스의 작성
2.1 인터페이스 작성법
interface InterfaceName {

  public static final Type CONSTANT_NAME = value;
  public abstract methodName();

}
2.2 인터페이스 멤버들의 제약사항
- 모든 멤버변수는
public static final이어야 하며, 이를 생략할 수 있음. - 모든 메서드는
public abstract이어야 하며, 이를 생략할 수 있음. static메서드,default메서드는 예외(JDK 1.8부터 변경)
3. 인터페이스의 상속
인터페이스는 인터페이스로부터만 상속 이 가능하며, 클래스와 달리 다중상속이 가능 하다.
interface Movable {
  void move(int x, int y);
}

interface Attackable {
  void attack(Unit u);
}

// 인터페이스만 상속가능, 다중상속
interface Fightable extends Movable, Attackable {
  // ...
}
4. 인터페이스의 구현
4.1. 인터페이스의 구현법
class ClassName implements InterfaceName {
  // 인터페이스에 정의된 추상메서드 구현
}
- 인터페이스도 추상클래스처럼 그 자체로 인스턴스 생성이 불가능하다.
- 만약 구현하는 인터페이스의 메서드 중 일부만 구현한다면
abstract를 붙여 추상클래스를 선언해줘야한다. - 상속과 구현을 동시에 할 수도 있다.
4.2 인터페이스 구현 예제 1
// 테스트 클래스
public class FighterTest {
  public static void main(String[] args) {

    Fighter fighter = new Fighter();

    if (fighter instanceof Unit)
      System.out.println("fighter는 Unit클래스의 자손입니다.");
    if (fighter instanceof Fightable)
      System.out.println("fighter는 Fighter인터페이스를 구현했습니다.");
    if (fighter instanceof Moveable)
      System.out.println("fighter는 Moveable인터페이스를 구현했습니다.");
    if (fighter instanceof Attackable)
      System.out.println("fighter는 Attackable인터페이스를 구현했습니다.");
    if (fighter instanceof Object)
      System.out.println("fighter는 Object클래스의 자손입니다.");

  }
}

// 파이터 클래스 : 유닛 클래스 상속, 싸움 인터페이스 구현
class Fighter extends Unit implements Fightable {

  public void move(int x, int y) {
    // ...
  }

  public void attack(Unit unit) {
    // ...
  }
}

// 유닛 클래스
class Unit {
  int currentHP;
  int x;
  int y;
}

// 싸움 인터페이스 : 이동, 공격 인터페이스 다중상속
interface Fightable extends Moveable, Attackable {

}

// 이동 인터페이스
interface Moveable {
  void move(int x, int y);
}

// 공격 인터페이스
interface Attackable {
  void attack(Unit unit);
}
fighter는 Unit클래스의 자손입니다.
fighter는 Fighter인터페이스를 구현했습니다.
fighter는 Moveable인터페이스를 구현했습니다.
fighter는 Attackable인터페이스를 구현했습니다.
fighter는 Object클래스의 자손입니다.
5. 인터페이스를 이용한 다형성
5.1 인터페이스 타입의 참조변수
자손클래스의 인스턴스를 조상타입의 참조변수로 참조하는 것이 가능하다는 것을 다형성에서 배웠었다. 인터페이스도 인터페이스 타입의 참조변수로 이를 구현한 클래스의 인스턴스를 참조할 수 있고, 인터페이스 타입으로 형변환도 가능하다.
Fightable fightable = (Fightable) new Fighter();
Fightable fightable = new Fighter();
5.2 인터페이스 타입의 매개변수
메서드가 인터페이스 타입의 매개변수를 갖는다는 것은 메서드 호출 시 해당 인터페이스를 구현한 클래스의 인스턴스를 매개변수 로 제공해야한다는 것이다.
void attack(Fightable fightable) {
  // ...
}
5.3 인터페이스 리턴타입
메서드의 리턴타입을 인터페이스로 지정하는 것도 가능하다. 리턴타입이 인터페이스라는 것은 해당 인터페이스를 구현한 클래스의 인스턴스를 반환해야한다는 것 을 의미한다.
Fightable method() {
  //...
  Figther fighter = new Fighter();
  return fighter;
}
5.4 인터페이스 다형성 예제 1
// Parser 테스트 클래스
public class ParserTest {
    public static void main(String[] args) {
        Parseable parseable = ParserManager.getParser("XML");
        parseable.parse("document.xml");
        parseable = ParserManager.getParser("HTML");
        parseable.parse("document2.html");
    }
}

// 파싱 인터페이스
interface Parseable {
    public abstract void parse(String fileName);
}

// 파싱 매니저 클래스
class ParserManager {
    // static 메서드 : 인스턴스 생성 없이 사용 가능
    public static Parseable getParser(String type) {
        if (type.equals("XML")) {
            return new XMLParser();
        } else {
            return new HTMLParser();
        }
    }
}

// XML 파싱 클래스 : 파싱 인터페이스 구현
class XMLParser implements Parseable {

    public void parse(String fileName) {
        System.out.println(fileName + " - XML parsing completed");
    }
}

// HTML 파싱 클래스 : 파싱 인터페이스 구현
class HTMLParser implements Parseable {

    public void parse(String fileName) {
        System.out.println(fileName + " - HTML parsing completed");
    }
}
document.xml - XML parsing completed
document2.html - HTML parsing completed
7. 인터페이스의 장점
7.1 장점
- 개발시간을 단축시킬 수 있다.
- 표준화가 가능하다.
- 서로 관계없는 클래스들에게 관계를 맺어줄 수 있다.
- 독립적인 프로그래밍이 가능하다.
7.2 인터페이스의 장점 예제 1
// 수리 테스트 클래스
public class RepairableTest {
  public static void main(String[] args) {
    Tank tank = new Tank();
    DropShip dropShip = new DropShip();
    Marine marine = new Marine();
    SCV scv = new SCV();

    scv.repair(tank);
    scv.repair(dropShip);
    //scv.repair(marine); // Repairable 인터페이스를 구현하지 않은 클래스의 인스턴스
  }
}

// 수리 인터페이스
interface Repairable {

}

// 지상유닛
class GroundUnit extends TerranUnit {

  public GroundUnit(int hp) {
    super(hp);
  }

}

// 공중유닛
class AirUnit extends TerranUnit {

  public AirUnit(int hp) {
    super(hp);
  }

}

// 유닛
class TerranUnit {

  int hitPoint;
  final int MAX_HP;

  TerranUnit(int hp) {
    MAX_HP = hp;
  }

}

// 탱크 : 지상유닛 상속, 수리 인터페이스 구현
class Tank extends GroundUnit implements Repairable {

  public Tank() {
    super(150);
    hitPoint = MAX_HP;
  }

  public String toString() {
    return "Tank";
  }

}

// 드랍쉽 : 공중유닛 상속, 수리 인터페이스 구현
class DropShip extends AirUnit implements Repairable {

  public DropShip() {
    super(125);
    hitPoint = MAX_HP;
  }

  public String toString() {
    return "DropShip";
  }
}

// 마린 : 지상유닛 상속
class Marine extends GroundUnit {

  public Marine() {
    super(40);
    hitPoint = MAX_HP;
  }

}

// SCV : 지상유닛 상속, 수리 인터페이스 구현
class SCV extends GroundUnit implements Repairable {

  public SCV() {
    super(60);
    hitPoint = MAX_HP;
  }

  // 수리 메서드 : 매개변수는 Repairable 인터페이스를 구현한 클래스의 인스턴스
  void repair(Repairable repairable) {
    // 매개변수로 넘어온 repairable은 정의된 멤버가 없기 때문에 repairable타입의 참조변수로는 할 수 있는게 없다.
    // 그래서 repairable연사자를 통해 타입을 체크
    if (repairable instanceof TerranUnit) {
      // hitPoint 와 MAX_HP를 사용하기 위해서는 TerranUnit 으로 형변환
      TerranUnit unit = (TerranUnit) repairable;
      // 현재 체력과 최대 체력이 같아질 때까지 체력을 증가시키는 작업을 수행
      while (unit.hitPoint != unit.MAX_HP) {
          unit.hitPoint++;
      }
      System.out.println(unit.toString() + "의 수리가 완료되었습니다.");
    }
  }
}
Tank의 수리가 완료되었습니다.
DropShip의 수리가 완료되었습니다.
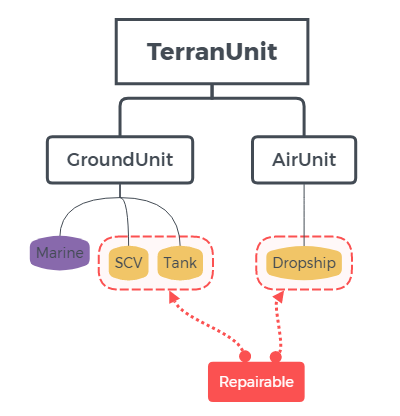
위 예제는 스타크래프트에 나오는 일부 유닛을 대상으로 클래스를 구현했다. 스타크래프트에 나오는 테란의 모든 유닛의 최고 조상은 TerranUnit이고, 유닛의 종류에 따라 GroundUnit, AirUnit으로 나누어진다. 그리고 GroundUnit은 다시 Marine, Tank, SCV가 있고, AirUnit은 Dropship이 있다. SCV에게 Tank, Dropship과 같은 기계화 유닛을 수리할 수 있는 기능을 제공하기 위해 repair()를 정의한다면 다음과 같을 것이다.
void repair(Tank tank) {
  // 탱크 수리
}

void repair(Dropship dropship) {
  // 드랍쉽 수리
}
이런식으로 수리가 가능한 유닛의 개수만큼 다른 버전의 오버로딩된 메서드를 정의를 해야만한다. 이것을 피하기 위해서는 매개변수 타입을 이들의 공통조상으로 하면 좋겠지만 Dropship의 경우는 공통조상이 다르기 때문에 공통조상의 타입으로 메서드를 재정의한다고 하더라도 최소한 2개의 메서드가 필요하게된다.
void repair(GroundUnit groundUnit) {
  // 지상유닛 수리
}

void repair(AirUnit airUnit) {
  // 공중유닛 수리
}
하지만 이렇게 할 경우 Marine과 같이 수리될 수 없는 유닛의 경우가 매개변수로 들어갈 때 문제가 발생하게 된다. 이러한 문제를 해결하기 위해서 이 때 인터페이스를 이용하면 기존의 상속체계를 유
지하면서 수리가 가능한 기계화 유닛에 공통점을 부여할 수가 있다. 아래와 같이 Repairable이라는 인터페이스를 정의하고 수리가 가능하 기계화 유닛에게 인터페이스를 구현하도록 하면된다.
// 수리 인터페이스
interface Repairable {

}

// 지상유닛 상속, 수리인터페이스 구현
class SCV extends GroundUnit implements Repairable {
  // ...
}

// 지상유닛 상속, 수리인터페이스 구현
class Tank extends GroundUnit implements Repairable {
  // ...
}

// 공중유닛 상속, 수리인터페이스 구현
class Dropship extends AirUnit implements Repairable {
  // ...
}
그리고 SCV의 repair()의 매개변수 타입을 Repairable로 선언하면, Repairable인터페이스를 구현한 클래스의 인스턴스만 사용이 가능하게 된다.
void repair(Repairable repairable) {
  // 수리
}
아래의 그림은 지금까지 구현한 예제의 클래스와 인터페이스의 상속도인데 이것을 보면 지금까지 설명한 내용을 보다 쉽게 이해할 수 있다.
8. 인터페이스의 이해
8.1 인터페이스를 이해하기 위해 염두해두어야할 사항 2가지
- 클래스를 사용하는 쪽(User)과 클래스를 제공하는 쪽(Provider)이 있다.
- 메서드를 사용(호출)하는 쪽(User)애서는 사용하려는 메서드(Provider)의 선언부만 알면된다.
8.2 인터페이스의 이해 예제1 : 직접적인 관계의 클래스들
// 인터페이스 테스트 클래스
public class InterfaceTest {
  public static void main(String[] args) {
    A a = new A();
    a.methodA(new B());
  }
}

class A {
  public void methodA(B b) {
    b.methoB();
  }
}

class B {
  public void methodB() {
    System.out.println("methodB()");
  }
}
methodB()
위의 예제를 보면 A클래스는 B클래스의 인스턴스를 생성하고 메서드를 호출하는 직접적인 관계(A-B)에 있다. 이 경우 A클래스를 작성하기 위해서는 클래스 B가 작성되어 있어야하고, 클래스 B의 methodB()의 선언부가 변경되면, 이를 사용하는 클래스 A도 변경되어야한다. 이와 같이 직접적인 관계의 두 클래스는 한쪽이 변경되면 다른 한쪽도 변경되어야한다는 단점이 있다.
8.3 인터페이스의 이해 예제 2 : 간접적인 관계의 클래스들(인터페이스 사용)
public class InterfaceTest2 {
  public static void main(String[] args) {
    A a = new A();
    a.autoPlay(new B());
    a.autoPlay(new C());
  }
}

class A {
  void autoPlay(I i) {
    i.play();
  }
}

interface I {
  public abstract void play();
}

class B implements I {
  public void play() {
    System.out.println("play in B class");
  }
}

class C implements I {
  public void play() {
    System.out.println("play in C class");
  }
}
play in D class
play in E class
위의 예제는 A클래스가 B클래스를 직접 호출하지 않고, 인터페이스 I를 매개체로 호출하는 간접적인 관계(A-I-B)로 바뀌었다. 첫번째 예제와 달리 A클래스를 작성하는데 B클래스가 관련되어 있지 않다는 것도 알 수가 있다. A클래스는 여전히 B클래스의 메서드를 호출하지만 인터페이스 I와 직접적인 관계에 있기 때문에 클래스 B의 변경에 영향을 받지 않게 되었다.
8.4 인터페이스의 이해 예제 3 : 제 3의 클래스를 이용
public class InterfaceTest3 {
  public static void main(String[] args) {
    A a = new A();
    a.methodA();
  }
}

class A {
  void methodA() {
    I i = InstanceManager.getInstance();
    i.methodB();
    // Object에 정의된 메서드들은 모두 호출가능
    System.out.println(i.toString());
  }
}

interface I {
  public abstract void methodB();
}

class B implements I {
  public void methodB() {
    System.out.println("methodB in B class");
  }

  public String toString() {
    return "class B";
  }
}

class InstanceManager {
  // 인스턴스를 제공한다.
  public static I getInstance() {
    // 인스턴스를 변경해야될 경우 이부분만 변경
    return new B();
  }
}
이번 예제는 인스턴스를 직접 생성하지 않고, InstanceManager클래스의 getInstance()를 통해 제공받는다. 이렇게 할 경우 나중에 다른 클래스의 인스턴스로 변경될 경우에도 A클래스의 변경없이 getInstance()만 변경하면된다.
9. 디폴트 메서드와 static메서드
앞서 잠깐 언급했던 것처럼 인터페이스는 추상 메서드만 선언할 수 있지만, JDK1.8부터는 디폴트메서드와 static메서드를 추가할 수 있게 되었다. static메서드는 인스턴스와 관계가 없는 독립적인 메서드이기 때문에 인터페이스에 추가하지 못할 이유가 없었다. 하지만 보다 자바를 쉽게? 배울수 있게 하기 위해 규칙을 단순화할 필요가 있어 예외로 두지 않았다고 한다.
9.1 디폴트 메서드
인터페이스에 새로운 메서드를 추가한다는 것은 추상메서드를 추가한다는 것이고, 이 인터페이스를 구현한 기존의 모든 클래스에 새로운 메서드를 구현해야만 하는 상황이 벌어지게된다. 물론 인터페이스가 변경되지 않으면 제일 좋지만, 변경은 언제 어디서나 일어나는 것이기에 이러한 문제를 해결하기 위해 고안해낸 것이 바로 디폴트 메서드이다. 디폴트 메서드는 추상 메서드의 기본적인 구현을 제공하는 메서드로, 추상 메서드가 아니기 때문에 디폴트 메서드가 추가되더라도 해당 인터페이스를 구현한 클래스를 변경하지 않아도 된다.
interface MyInterface {
  void method();
  void newMethod(); // 새롭게 추가된 추상메서드, MyInterface를 구현한 모든 클래스에는 새롭게 추가된 메서드를 구현해야만 함
}
interface MyInterface {
  void method();
  default void newMethod() {  // 디폴트 메서드, 마치 부모 클래스에 메서드를 추가한 것과 같은 효과
    // ...
  }
}
9.2 디폴트 메서드와 static 메서드 예제 1
public class DefaultMethodTest {
    public static void main(String[] args) {
        Child child = new Child();
        child.method1();
        child.method2();
        MyInterface.staticMethod();
        MyInterface2.staticMethod();
    }
}

class Child extends Parent implements MyInterface, MyInterface2 {
    public void method1() {
        System.out.println("method1() in Child");
    }
}

class Parent {
    public void method2() {
        System.out.println("method2() in Parent");
    }
}

interface MyInterface {
    default void method1() {
        System.out.println("method1() in MyInterface");
    }

    default void method2() {
        System.out.println("method2() in MyInterface");
    }

    static void staticMethod() {
        System.out.println("staticMethod() in MyInterface");
    }
}

interface MyInterface2 {
    default void method1() {
        System.out.println("method1() in MyInterface2");
    }

    static void staticMethod() {
        System.out.println("staticMethod() in MyInterface2");
    }
}
method1() in Child
method2() in Parent
staticMethod() in MyInterface
staticMethod() in MyInterface2