본 포스팅은 코드로 배우는스프링 웹프로젝트를 참조하여 작성한 내용입니다. 개인적으로 학습한 내용을 복습하기 위해 기록한 내용이기 때문에 오류가 있다면 지적 부탁드리겠습니다. 포스팅의 예제는 STS 또는 Eclipse를 사용하지 않고 IntelliJ를 통해 구현하고 있습니다. 그래서 기존의 STS에서 생성된 Spring 프로젝트의 스프링관련 설정 파일명과 프로젝트 구조가 약간 다를 수 있습니다. IntelliJ를 통한 Spring MVC 프로젝트 생성 포스팅을 참고해주시면 감사하겠습니다. 현재 프로젝트의 전체코드는 Github 저장소에서 확인하실 수 있습니다.
Spring-MVC 기본 개념 및 테스트 예제 관련 포스팅 링크
- IntelliJ에서 Spring MVC Project 생성하기
- Spring MVC - MySQL 연결테스트
- Spring MVC - MyBatis 설정 및 테스트
- Spring MVC 구조
- Spring MVC - Controller 작성 연습, WAS없이 Controller 테스트 해보기
- SpringMVC + MyBatis, DAO구현 테스트
Spring-MVC 게시판 예제 관련 포스팅 링크
포스팅과 관련된 내용 포스팅 링크
1. 기본 게시판 CRUD URI
게시글을 등록, 수정, 삭제, 조회, 목록 기능의 URI을 정리해보면 아래와 같다.
| 방식 | URI | 설명 |
|---|---|---|
| GET | /article/write | 게시글의 등록페이지 |
| POST | /article/write | 게시글의 등록처리 |
| GET | /article/list | 게시글의 목록페이지 |
| GET | /article/read?articleNo=게시글번호 | 게시글의 조회 |
| GET | /article/modify?articleNo=게시글번호 | 게시글의 수정페이지 |
| POST | /article/modify | 게시글의 수정처리 |
| POST | /article/remove | 게시글의 삭제처리 |
2. 게시글의 기본 CRUD관련 Controller 작성
게시글 컨트롤러를 작성하기에 앞서 알아두어야 할 사항들을 정리해보자.
- 파라미터의 수집은 SpringMVC에서 자동으로 이루어지므로, 파라미터의 수집이 필요할 경우 원하는 객체를 파라미터로 선언하고, 특별한 경우가 아니라면
VO클래스나DTO클래스를 파라미터로 사용하는 것이 편리하다. - 브라우저에서 들어오는 요청이 자동으로 파라미터로 지정한 클래스의 객체 속성 값으로 처리되는데 이것을 바인딩(Binding)이라고 한다.
- SpringMVC의
Model객체는 해당 메서드에서 뷰(JSP)에 필요한 데이터를 전달하는 용도로 사용되는데 메서드 내에 뷰로 전달할 데이터가 있다면MOdel을 파라미터로 선언해주는 것이 편리하다. RedirectAttributes객체는redirect되는 시점에 한번만 사용될 데이터를 전송할 수 있는addFlashAttribute()라는 메서드가 정의 되어있다. 이 메서드를 사용하면redirect된 페이지까지 데이터를 전송하지만 URI상에서는 보이지 않게된다.@RequestParam은Servlet에서request.getParameter()와 유사한 역할을 수행하는데 문자열, 숫자, 날짜 등의 형변환까지 가능하다.
게시글 컨트롤러(ArticleController)를 생성하고, 아래의 코드와 같이 작성해준다.
@Controller
@RequestMapping("/article")
public class ArticleController {

    private static final Logger logger = LoggerFactory.getLogger(ArticleController.class);

    private final ArticleService articleService;

    @Inject
    public ArticleController(ArticleService articleService) {
        this.articleService = articleService;
    }

}
컨트롤러 클래스 선언부에 @Controller애너테이션과 @RequestMapping("/article")을 추가한다. @RequestMapping("/article")을 추가함으로써 공통의 경로를 /article로 인식하도록 설정하였다. 보통 컨트롤러는 하나의 기능을 가진 모듈의 대표적인 경로를 갖도록 하는 것이 좋다. 이후 컨트롤러에 작성할 메서드들의 매핑URL의 길이를 줄여주는 장점도 가지게 된다.
각각의 요청에 응답할 메서드들을 아래와 같이 작성한다.
2.1 등록
// 등록 페이지 이동
@RequestMapping(value = "/write", method = RequestMethod.GET)
public String writeGET() {

    logger.info("write GET...");

    return "/article/write";
}
// 등록 처리
@RequestMapping(value = "/write", method = RequestMethod.POST)
public String writePOST(ArticleVO articleVO,
                        RedirectAttributes redirectAttributes) throws Exception {

    logger.info("write POST...");
    logger.info(articleVO.toString());
    articleService.create(articleVO);
    redirectAttributes.addFlashAttribute("msg", "regSuccess");

    return "redirect:/article/list";
}
게시글 등록 처리요청을 처리하고, redirect되는 시점에 RedirectAttributes객체의 addFlashAttribute()를 이용해 처리가 성공적으로 이루어진 것을 알리기 위해 regSuccess메시지를 String데이터로 저장해준다.
2.2 목록
// 목록 페이지 이동
@RequestMapping(value = "/list", method = RequestMethod.GET)
public String list(Model model) throws Exception {

    logger.info("list ...");
    model.addAttribute("articles", articleService.listAll());

    return "/article/list";
}
2.3 조회
// 조회 페이지 이동
@RequestMapping(value = "/read", method = RequestMethod.GET)
public String read(@RequestParam("articleNo") int articleNo,
                   Model model) throws Exception {

    logger.info("read ...");
    model.addAttribute("article", articleService.read(articleNo));

    return "/article/read";
}
2.4 수정
// 수정 페이지 이동
@RequestMapping(value = "/modify", method = RequestMethod.GET)
public String modifyGET(@RequestParam("articleNo") int articleNo,
                        Model model) throws Exception {

    logger.info("modifyGet ...");
    model.addAttribute("article", articleService.read(articleNo));

    return "/article/modify";
}
// 수정 처리
@RequestMapping(value = "/modify", method = RequestMethod.POST)
public String modifyPOST(ArticleVO articleVO,
                         RedirectAttributes redirectAttributes) throws Exception {

    logger.info("modifyPOST ...");
    articleService.update(articleVO);
    redirectAttributes.addFlashAttribute("msg", "modSuccess");

    return "redirect:/article/list";
}
게시글 수정 처리요청을 처리하고, redirect되는 시점에 RedirectAttributes객체의 addFlashAttribute()를 이용해 처리가 성공적으로 이루어진 것을 알리기 위해 modSuccess메시지를 String데이터로 저장해준다.
2.5 삭제
// 삭제 처리
@RequestMapping(value = "/remove", method = RequestMethod.POST)
public String remove(@RequestParam("articleNo") int articleNo,
                     RedirectAttributes redirectAttributes) throws Exception {

    logger.info("remove ...");
    articleService.delete(articleNo);
    redirectAttributes.addFlashAttribute("msg", "delSuccess");

    return "redirect:/article/list";
}
게시글 삭제 처리요청을 처리하고, redirect되는 시점에 RedirectAttributes객체의 addFlashAttribute()를 이용해 처리가 성공적으로 이루어진 것을 알리기 위해 delSuccess메시지를 String데이터로 저장해준다.
3. JSP파일 생성 및 수정
3.1 include페이지 수정 : head.jsp, left_column.jsp
JSTL과 EL을 사용하기 위해 head.jsp의 상단에 아래와 같이 코드를 추가시켜준다.
<%@ taglib prefix="c" uri="http://java.sun.com/jsp/jstl/core" %>
<%@ taglib prefix="fmt" uri="http://java.sun.com/jsp/jstl/fmt" %>
<%@ taglib prefix="fn" uri="http://java.sun.com/jsp/jstl/functions" %>
<c:set var="path" value="${pageContext.request.contextPath}"/>
그리고 왼쪽 사이드 메뉴를 사용하기 위해 left_column.jsp의 코드를 아래와 같이 수정해준다.
<ul class="sidebar-menu" data-widget="tree">
    <li class="header">메뉴</li>
    <li class="active"><a href="${path}/article/write"><i class="fa fa-edit"></i> <span>게시글 작성</span></a></li>
    <li><a href="${path}/article/list"><i class="fa fa-list"></i> <span>게시글 목록</span></a></li>
</ul>
3.2 JSP파일 생성, include경로 변경
WEB-INF/views/article디렉토리에 등록(write.jsp), 조회(read.jsp), 수정(modify.jsp), 목록(list.jsp) jsp파일을 생성해준다. 그리고 home.jsp의 전체 코드를 복사해 붙여넣고, 각각의 JSP파일의 include의 모든 경로를 아래와 같이 수정해준다.
<%@ include file="../include/head.jsp"%>
<%@ include file="../include/main_header.jsp"%>
<%@ include file="../include/left_column.jsp"%>
<%@ include file="../include/main_footer.jsp"%>
<%@ include file="../include/plugin_js.jsp"%>
4. 게시글 관련 페이지 작성
각각의 페이지의 내용은 <section class="content container-fluid">태그 안에 작성하면 된다.
4.1 게시글 등록 페이지 : write.jsp
<div class="col-lg-12">
    <form role="form" id="writeForm" method="post" action="${path}/article/write">
        <div class="box box-primary">
            <div class="box-header with-border">
                <h3 class="box-title">게시글 작성</h3>
            </div>
            <div class="box-body">
                <div class="form-group">
                    <label for="title">제목</label>
                    <input class="form-control" id="title" name="title" placeholder="제목을 입력해주세요">
                </div>
                <div class="form-group">
                    <label for="content">내용</label>
                    <textarea class="form-control" id="content" name="content" rows="30"
                              placeholder="내용을 입력해주세요" style="resize: none;"></textarea>
                </div>
                <div class="form-group">
                    <label for="writer">작성자</label>
                    <input class="form-control" id="writer" name="writer">
                </div>
            </div>
            <div class="box-footer">
                <button type="button" class="btn btn-primary"><i class="fa fa-list"></i> 목록</button>
                <div class="pull-right">
                    <button type="reset" class="btn btn-warning"><i class="fa fa-reply"></i> 초기화</button>
                    <button type="submit" class="btn btn-success"><i class="fa fa-save"></i> 저장</button>
                </div>
            </div>
        </div>
    </form>
</div>
4.2 게시글 목록 페이지 : list.jsp
<div class="col-lg-12">
    <div class="box box-primary">
        <div class="box-header with-border">
            <h3 class="box-title">게시글 목록</h3>
        </div>
        <div class="box-body">
            <table class="table table-bordered">
                <tbody>
                <tr>
                    <th style="width: 30px">#</th>
                    <th>제목</th>
                    <th style="width: 100px">작성자</th>
                    <th style="width: 150px">작성시간</th>
                    <th style="width: 60px">조회</th>
                </tr>
                <c:forEach items="${articles}" var="article">
                <tr>
                    <td>${article.articleNo}</td>
                    <td><a href="${path}/article/read?articleNo=${article.articleNo}">${article.title}</a></td>
                    <td>${article.writer}</td>
                    <td><fmt:formatDate value="${article.regDate}" pattern="yyyy-MM-dd a HH:mm"/></td>
                    <td><span class="badge bg-red">${article.viewCnt}</span></td>
                </tr>
                </c:forEach>
                </tbody>
            </table>
        </div>
        <div class="box-footer">
            <div class="pull-right">
                <button type="button" class="btn btn-success btn-flat" id="writeBtn">
                    <i class="fa fa-pencil"></i> 글쓰기
                </button>
            </div>
        </div>
    </div>
</div>
게시글 등록, 수정, 삭제 요청이 컨트롤러에서 처리가 되고, redirect되면서 redirectAttributes.addFlashAttribute()를 통해 저장된 데이터를 가지고 요청이 정상적으로 처리되었는지 알려주기 위해 아래와 같이 js코드를 작성해준다.
var result = "${msg}";
if (result == "regSuccess") {
    alert("게시글 등록이 완료되었습니다.");
} else if (result == "modSuccess") {
    alert("게시글 수정이 완료되었습니다.");
} else if (result == "delSuccess") {
    alert("게시글 삭제가 완료되었습니다.");
}
4.3 게시글 조회 페이지 : read.jsp
<div class="col-lg-12">
    <div class="box box-primary">
        <div class="box-header with-border">
            <h3 class="box-title">글제목 : ${article.title}</h3>
        </div>
        <div class="box-body" style="height: 700px">
            ${article.content}
        </div>
        <div class="box-footer">
            <div class="user-block">
                <img class="img-circle img-bordered-sm" src="/dist/img/user1-128x128.jpg" alt="user image">
                <span class="username">
                    <a href="#">${article.writer}</a>
                </span>
                <span class="description"><fmt:formatDate pattern="yyyy-MM-dd a HH:mm" value="${article.regDate}"/></span>
            </div>
        </div>
        <div class="box-footer">
            <form role="form" method="post">
                <input type="hidden" name="articleNo" value="${article.articleNo}">
            </form>
            <button type="submit" class="btn btn-primary listBtn"><i class="fa fa-list"></i> 목록</button>
            <div class="pull-right">
                <button type="submit" class="btn btn-warning modBtn"><i class="fa fa-edit"></i> 수정</button>
                <button type="submit" class="btn btn-danger delBtn"><i class="fa fa-trash"></i> 삭제</button>
            </div>
        </div>
    </div>
</div>
게시글 조회 페이지의 하단 버튼(목록, 수정, 삭제)를 제어하기 위해 아래와 같이 jQuery코드를 작성해준다. 각각의 버튼을 클릭함에 따라 form태그 속성 값을 변경하기 위해 attr()을 사용했다.
$(document).ready(function () {

    var formObj = $("form[role='form']");
    console.log(formObj);

    $(".modBtn").on("click", function () {
        formObj.attr("action", "/article/modify");
        formObj.attr("method", "get");
        formObj.submit();
    });

    $(".delBtn").on("click", function () {
       formObj.attr("action", "/article/remove");
       formObj.submit();
    });

    $(".listBtn").on("click", function () {
       self.location = "/article/list"
    });

});
4.4 게시글 수정 페이지 : modify.jsp
<div class="col-lg-12">
    <form role="form" id="writeForm" method="post" action="${path}/article/modify">
        <div class="box box-primary">
            <div class="box-header with-border">
                <h3 class="box-title">게시글 작성</h3>
            </div>
            <div class="box-body">
                <input type="hidden" name="articleNo" value="${article.articleNo}">
                <div class="form-group">
                    <label for="title">제목</label>
                    <input class="form-control" id="title" name="title" placeholder="제목을 입력해주세요" value="${article.title}">
                </div>
                <div class="form-group">
                    <label for="content">내용</label>
                    <textarea class="form-control" id="content" name="content" rows="30"
                              placeholder="내용을 입력해주세요" style="resize: none;">${article.content}</textarea>
                </div>
                <div class="form-group">
                    <label for="writer">작성자</label>
                    <input class="form-control" id="writer" name="writer" value="${article.writer}" readonly>
                </div>
            </div>
            <div class="box-footer">
                <button type="button" class="btn btn-primary"><i class="fa fa-list"></i> 목록</button>
                <div class="pull-right">
                    <button type="button" class="btn btn-warning cancelBtn"><i class="fa fa-trash"></i> 취소</button>
                    <button type="submit" class="btn btn-success modBtn"><i class="fa fa-save"></i> 수정 저장</button>
                </div>
            </div>
        </div>
    </form>
</div>
수정 페이지의 하단 버튼을 제어하기 위해 아래와 같이 jQuery코드를 작성해준다.
$(document).ready(function () {

    var formObj = $("form[role='form']");
    console.log(formObj);

    $(".modBtn").on("click", function () {
        formObj.submit();
    });

    $(".cancelBtn").on("click", function () {
        history.go(-1);
    });

    $(".listBtn").on("click", function () {
        self.location = "/article/list"
    });

});
5. 기본적인 CRUD 구현 모습 확인
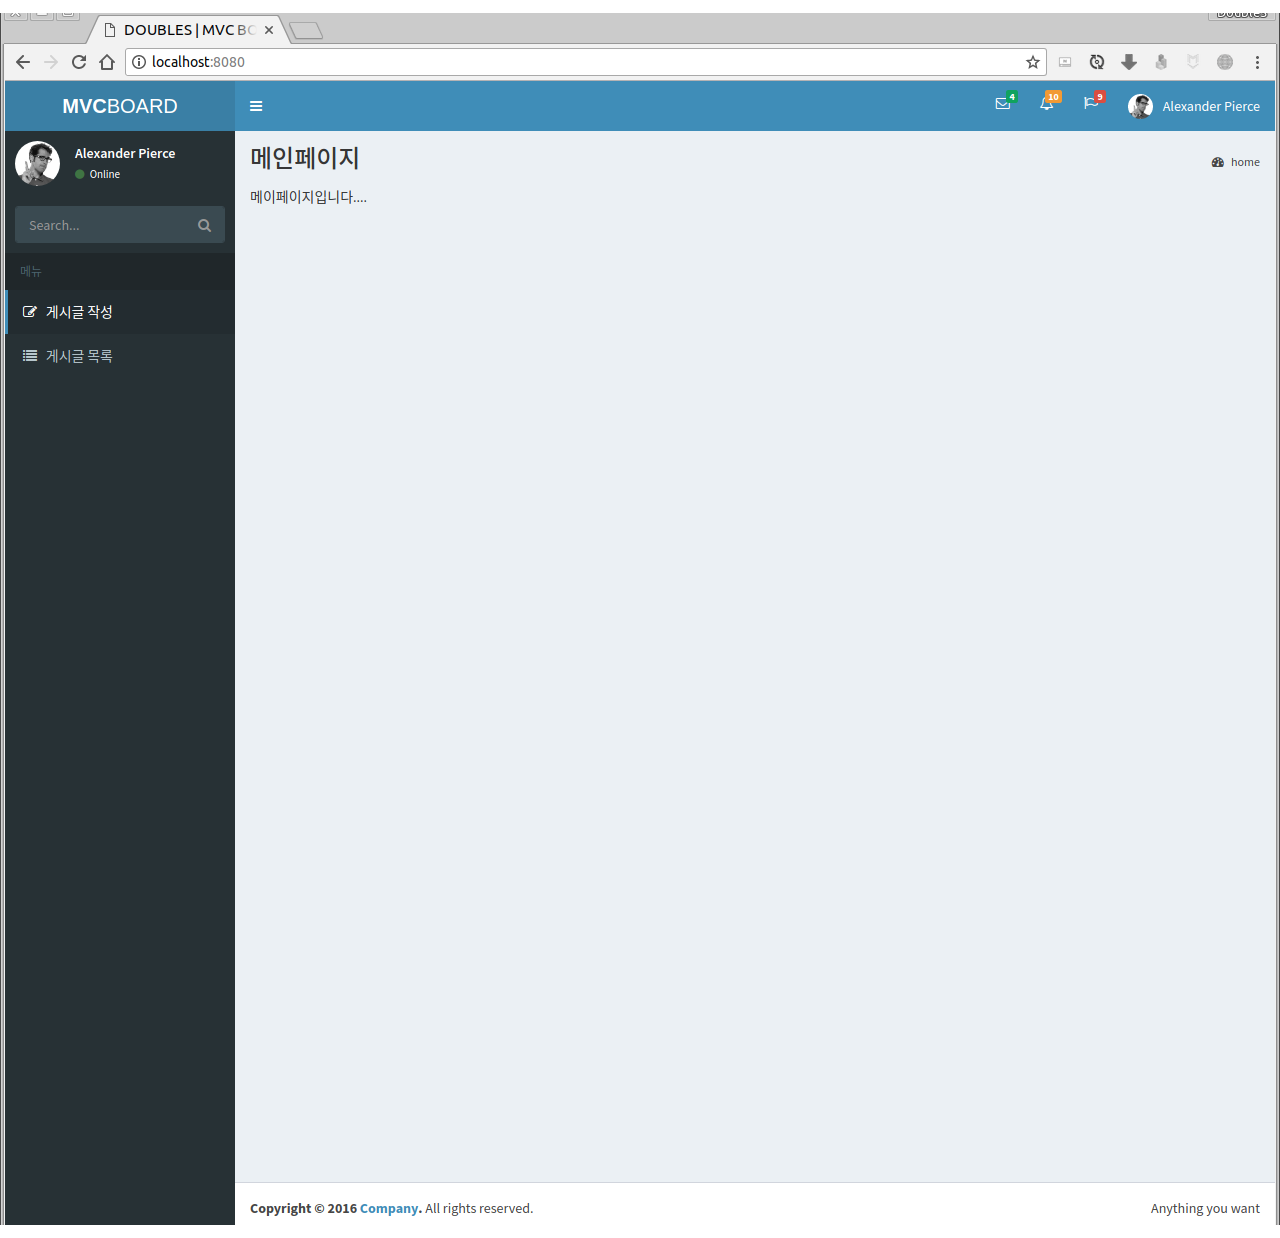
5.1 메인페이지
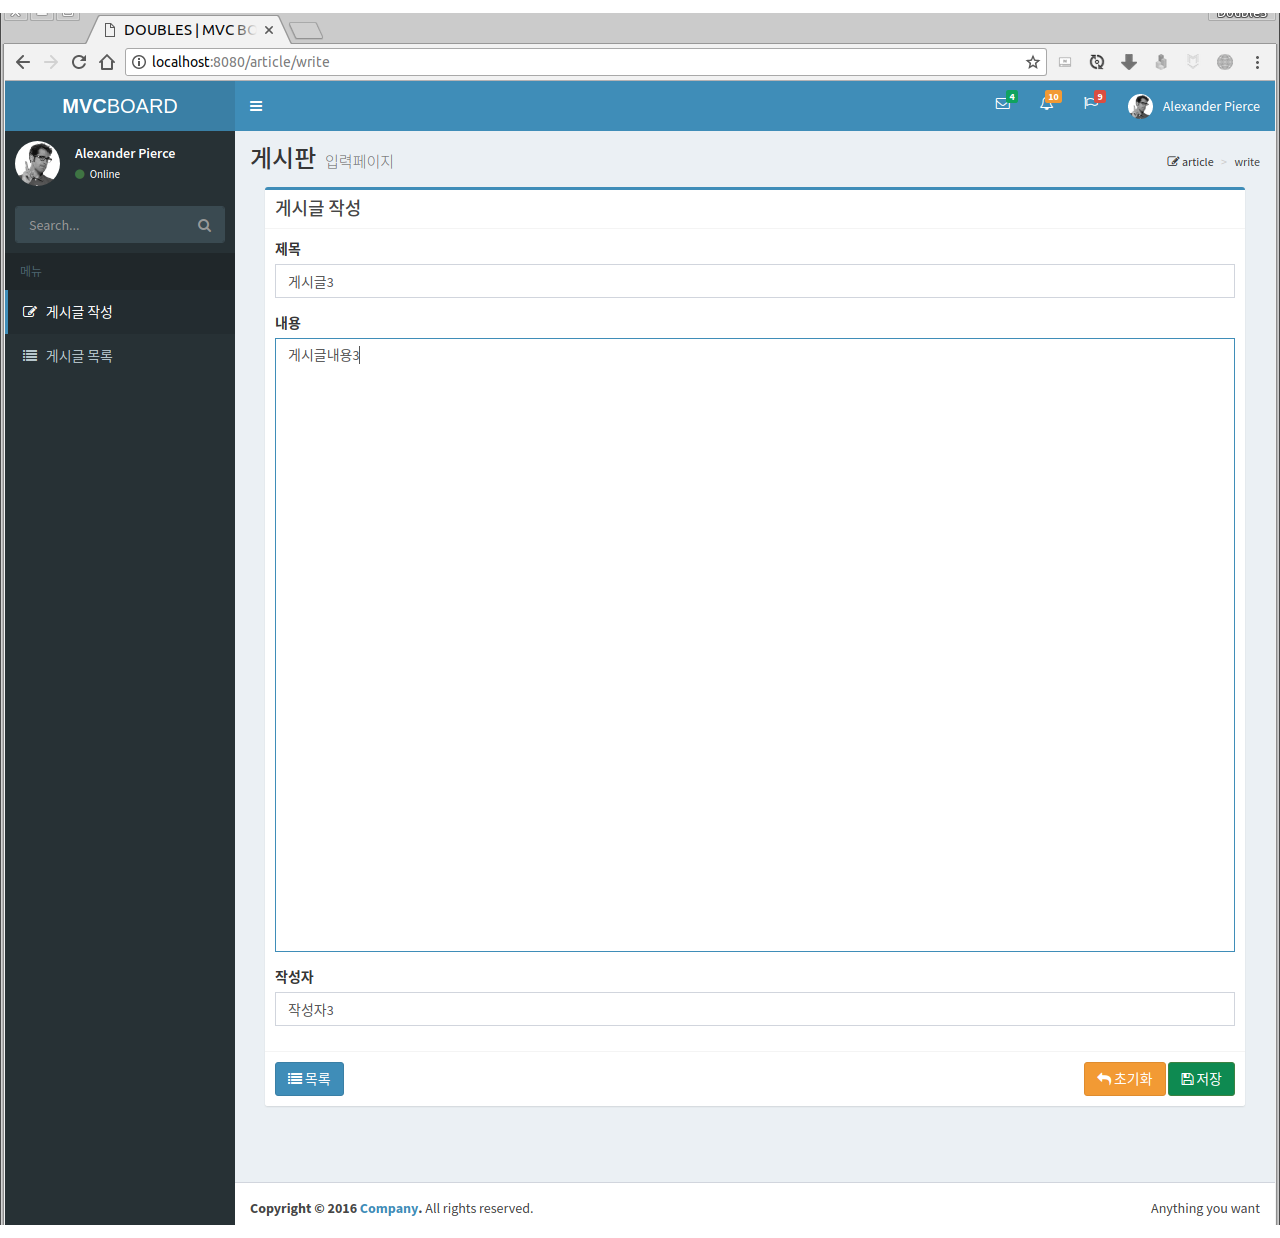
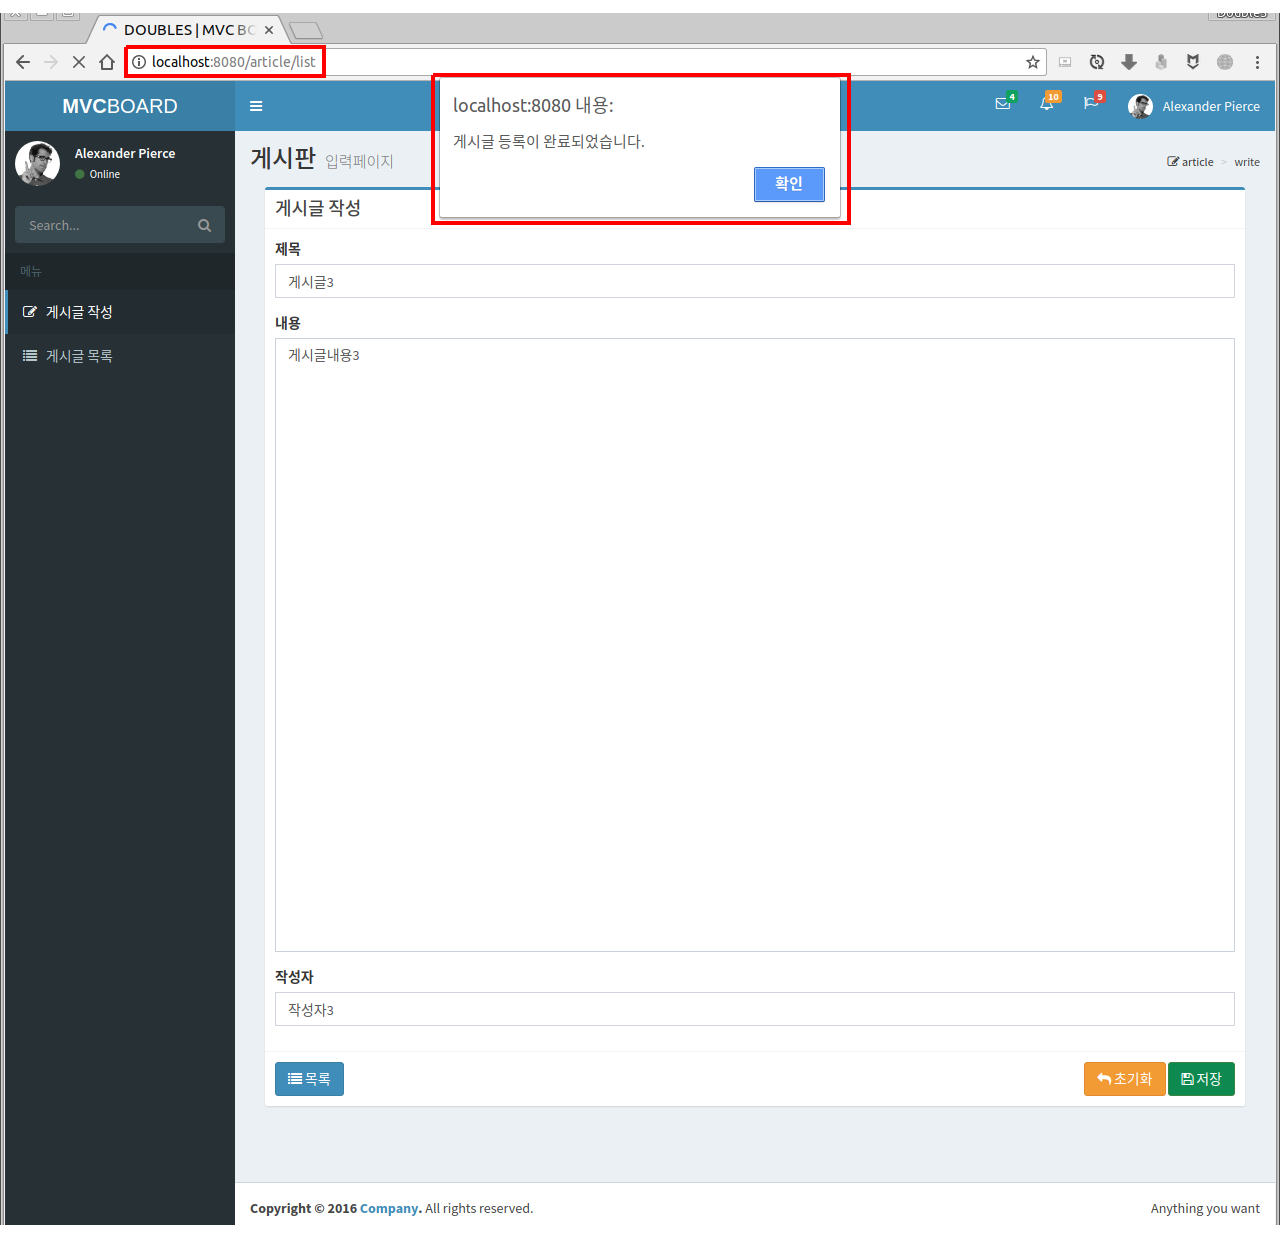
5.2 게시글 등록처리
게시글 등록 페이지
게시글 등록처리 성공알림
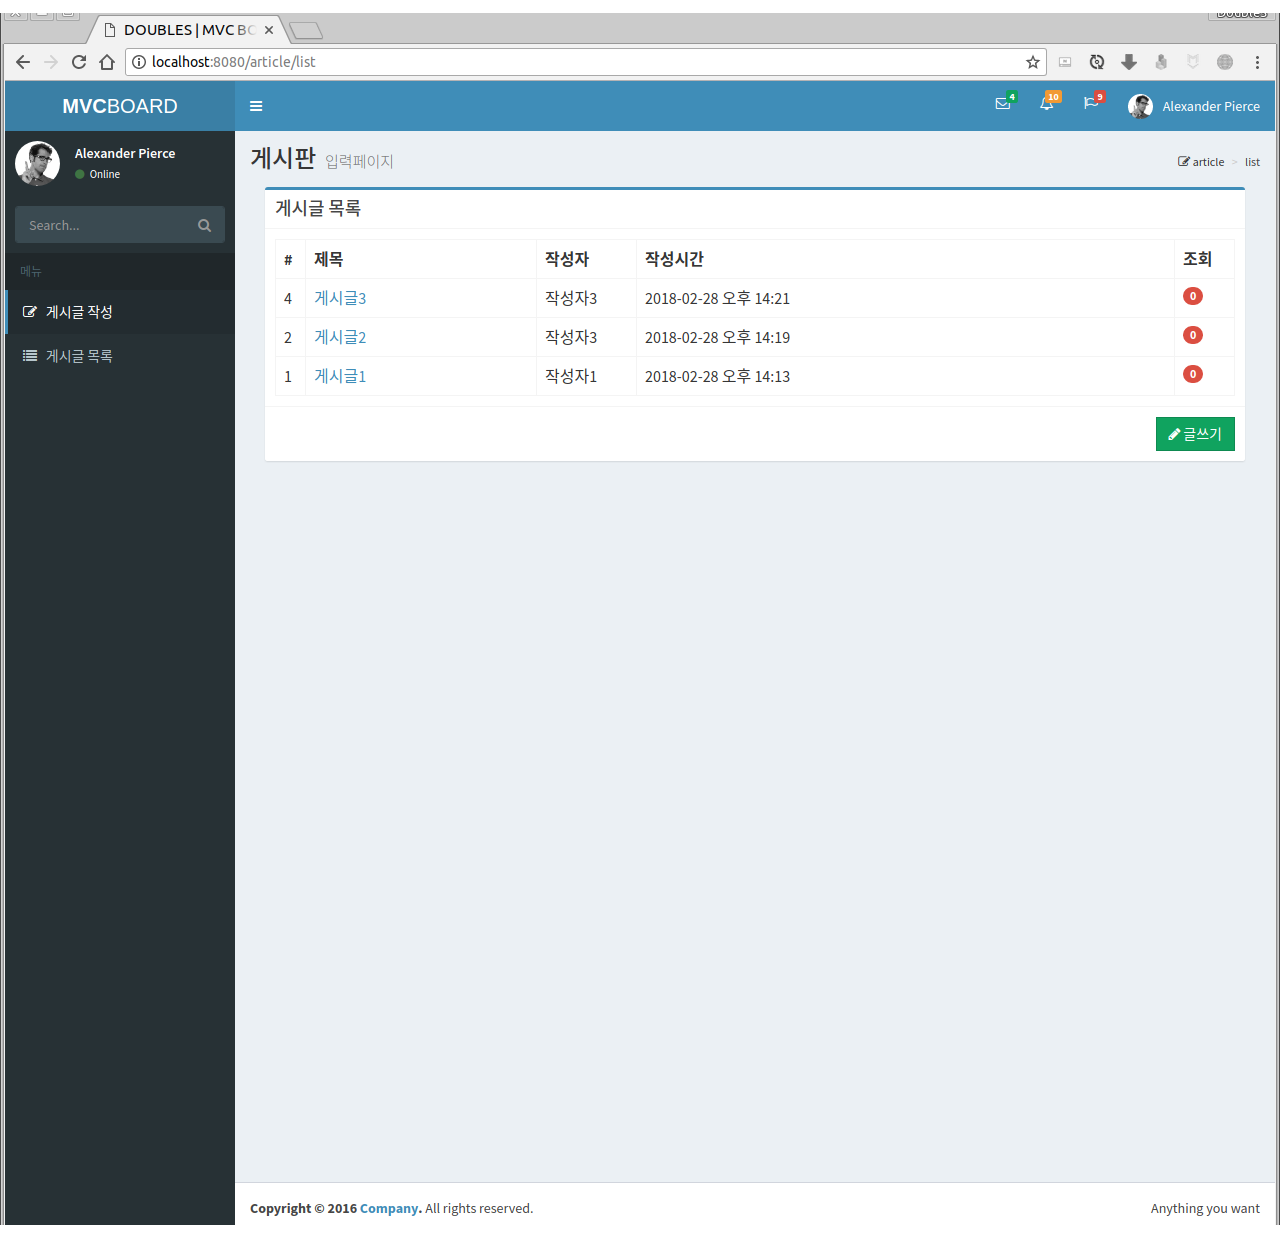
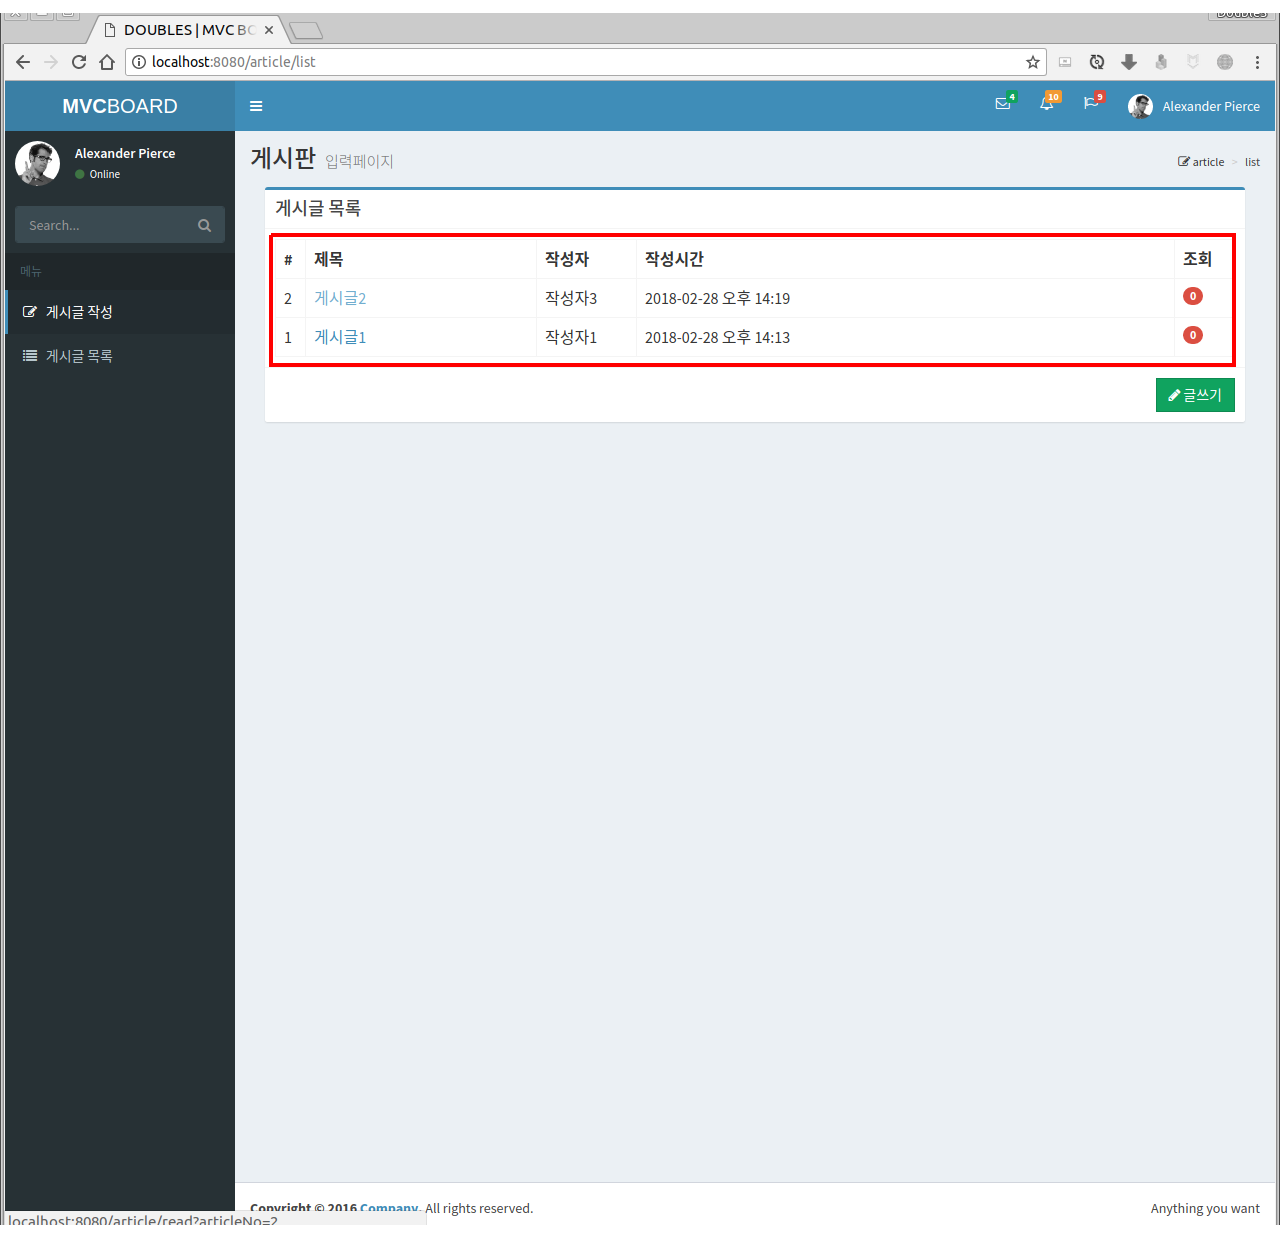
5.3 게시글 목록
게시글 목록 페이지
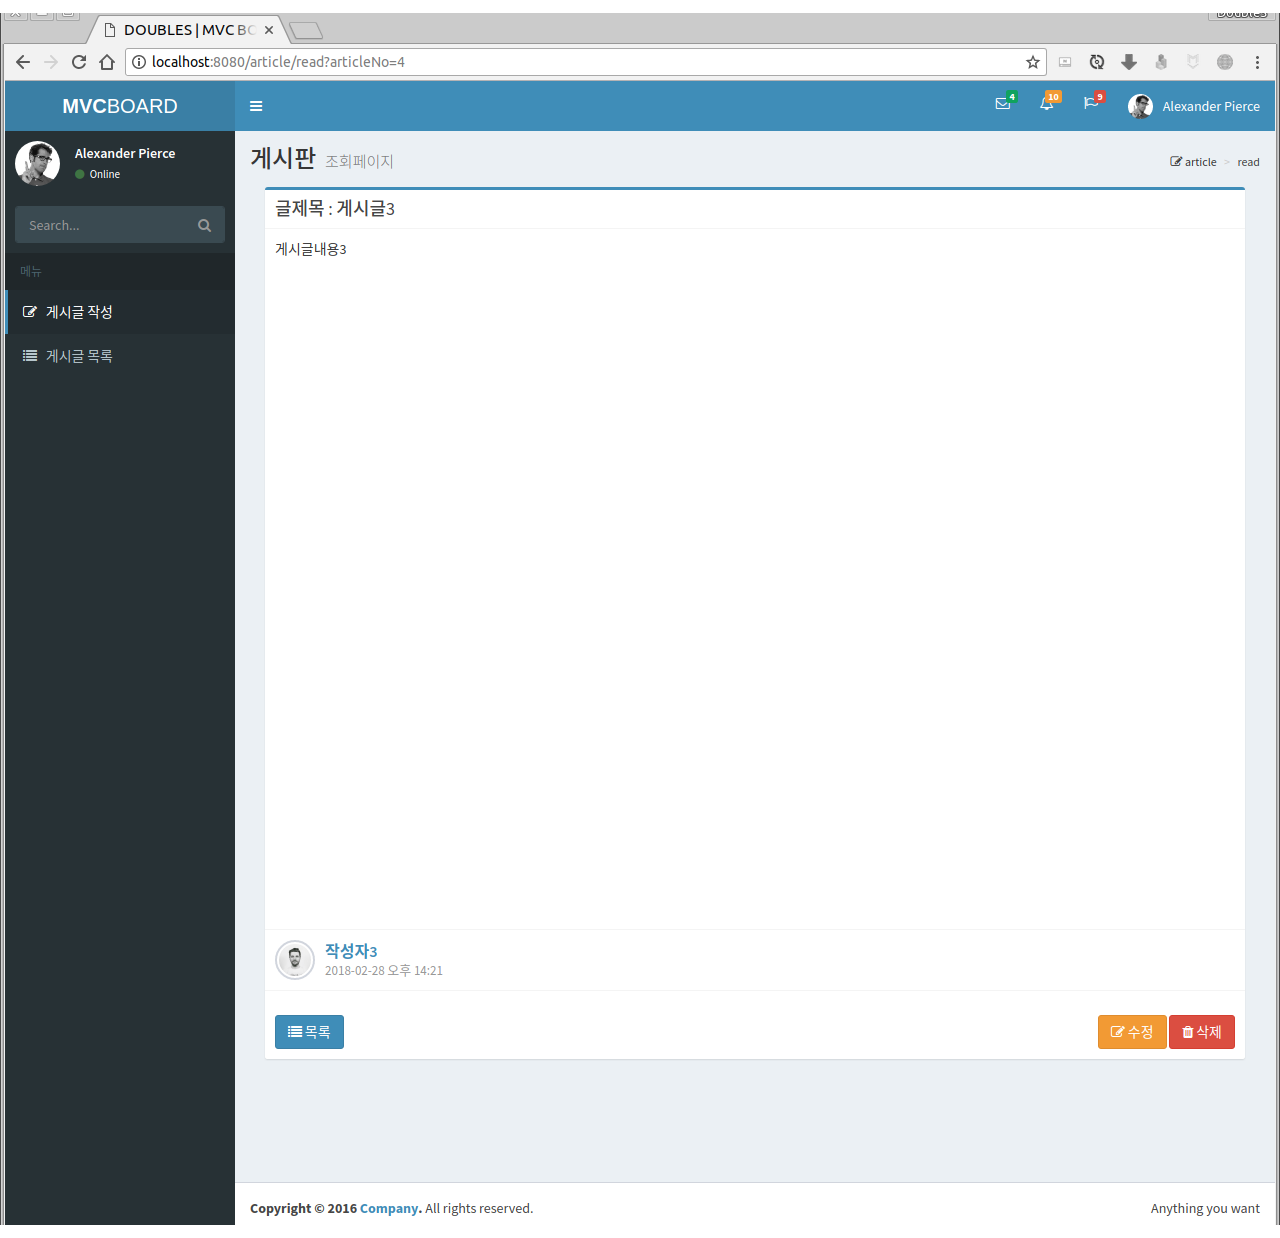
5.4 게시글 조회
게시글 조회 페이지
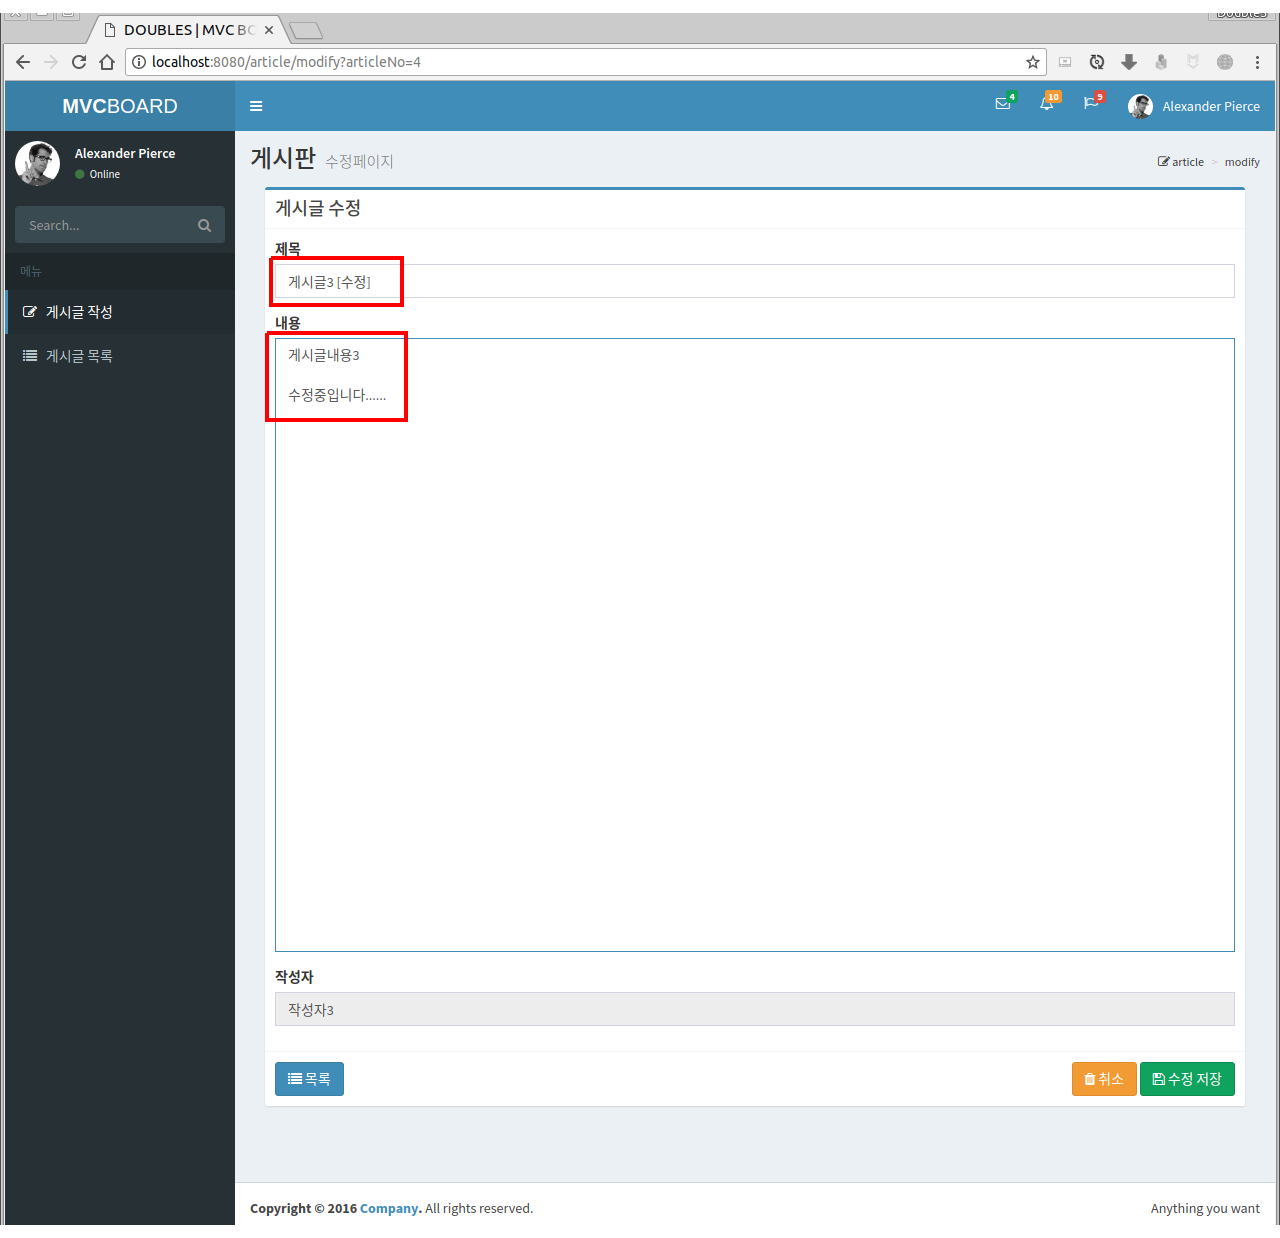
5.5 게시글 수정
게시글 수정 페이지
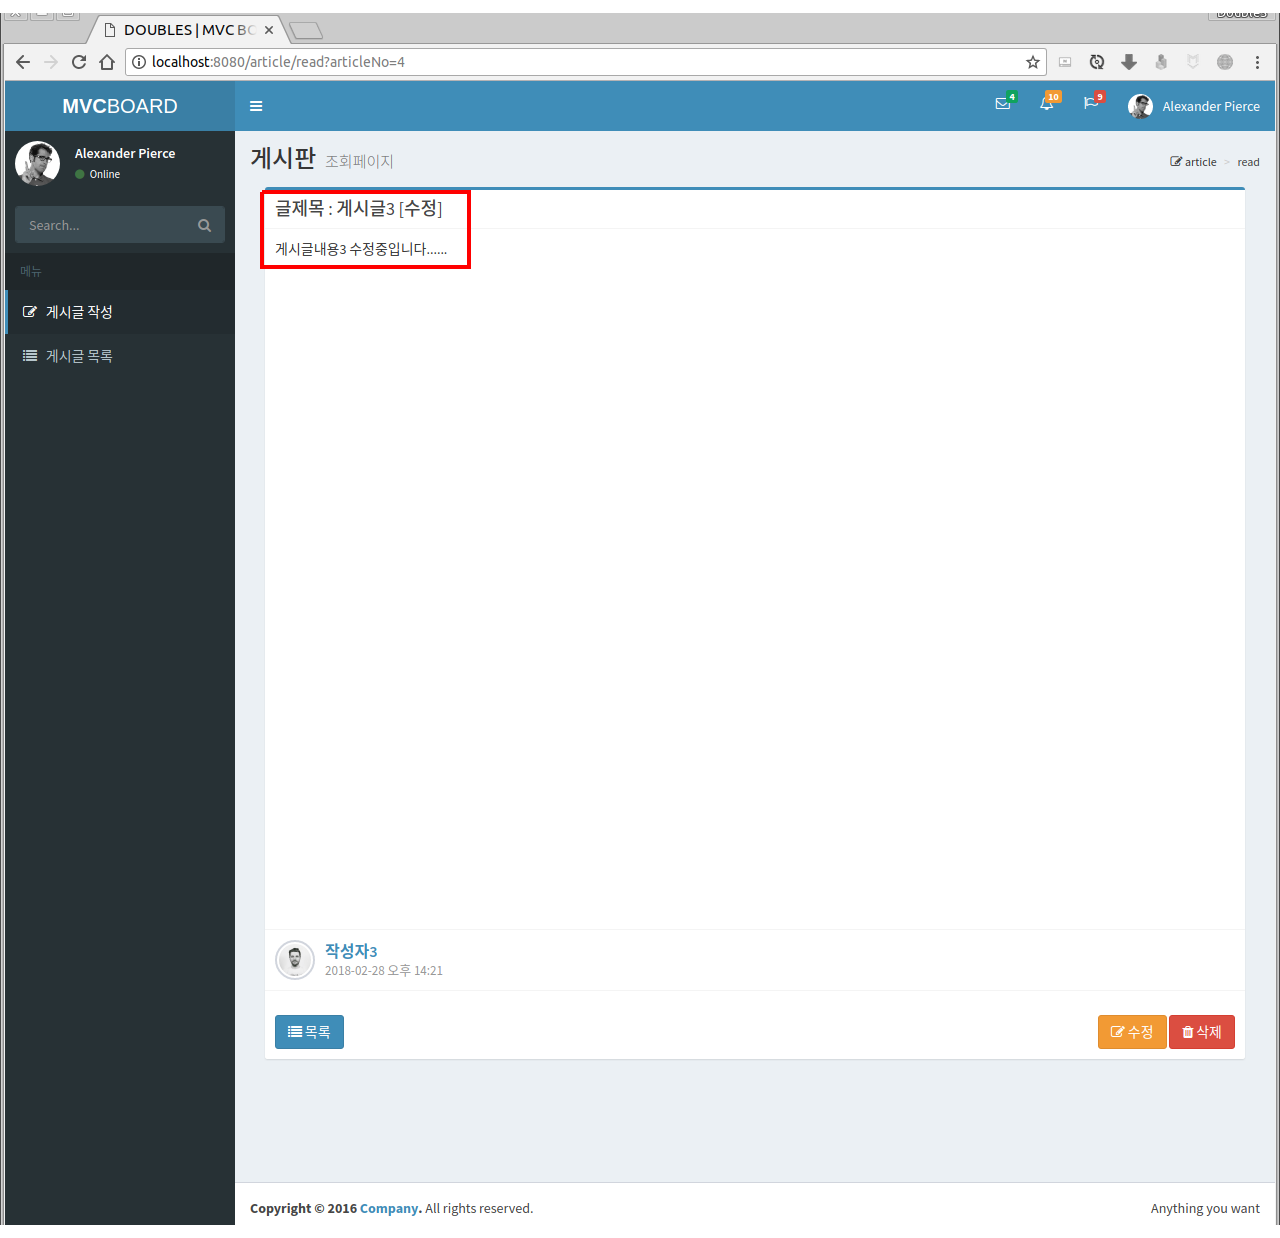
게시글 수정처리 성공알림

게시글 수정 처리 완료후
5.6 게시글 삭제처리
게시글 삭제처리 성공알림

게시글 삭제처리 완료 후
6. 간단 요약 정리
게시판 예제의 기본적인 CRUD기능 control, presentation 계층 구현을 완료했다. 지금까지 구현한 내용을 간단히 요약정리 해보자.
6.1 Controller
@RequestMapping: 매핑처리, GET/POST, URI@RequestParam: 파라미터 전달, 형변환이 가능RedirectAttributes.addFlashAttribute():redirect처리시 사용될 데이터를 저장하기 위해
6.2 JSP
EL,JSTL을 사용하기 위해head.jsp에 태그 추가 작성include페이지 수정과include경로 수정JS,jQuery를 이용해 페이지 요청처리
7. 추가적으로 구현해야할 사항들
게시글을 처리하는 예제를 구현하면서 앞으로 추가될 사항들을 정리해보자.
- 예외 발생의 처리
- 게시글의 입력 항목들의 검증처리
- 게시글 조회시 이스케이프 문자처리
- 게시글 목록의 페이징과 검색처리